ファイアウォール
本章では、RESTで設定が出来るファイアウォールの使用方法について説明します。
シングルテナントでの動作例
以下のようなトポロジを作成し、スイッチs1に対してルールの追加・削除を行う例を紹介します。
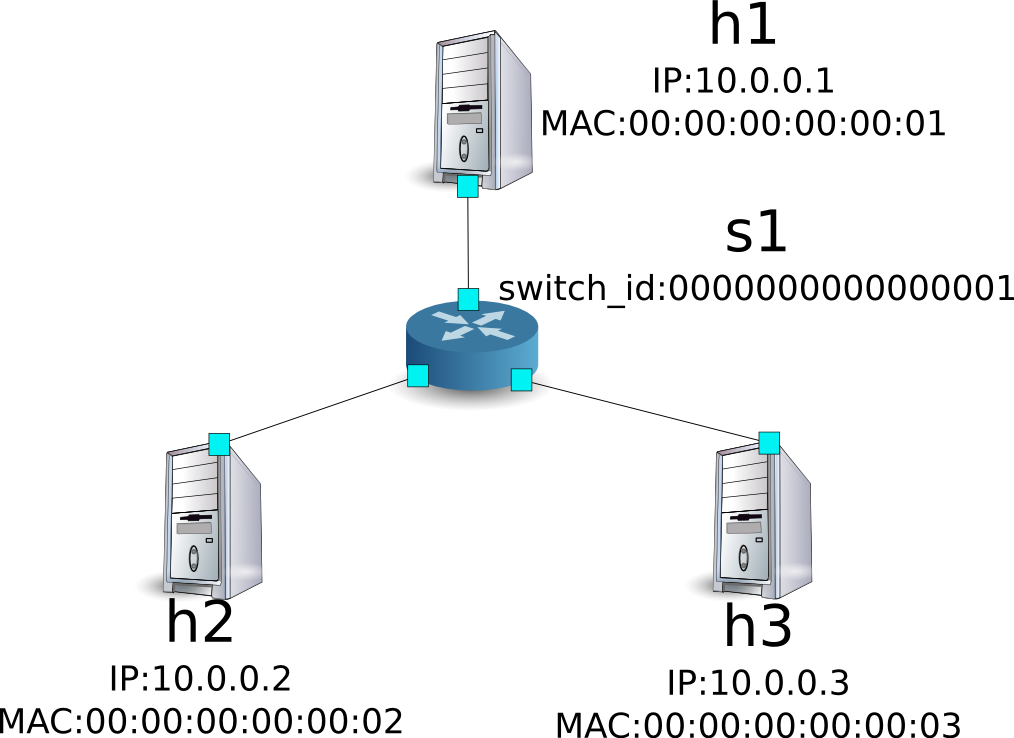
環境構築
まずはMininet上に環境を構築します。入力するコマンドは「スイッチングハブ」と同様です。
ryu@ryu-vm:~$ sudo mn --topo single,3 --mac --switch ovsk --controller remote -x
*** Creating network
*** Adding controller
Unable to contact the remote controller at 127.0.0.1:6633
*** Adding hosts:
h1 h2 h3
*** Adding switches:
s1
*** Adding links:
(h1, s1) (h2, s1) (h3, s1)
*** Configuring hosts
h1 h2 h3
*** Running terms on localhost:10.0
*** Starting controller
*** Starting 1 switches
s1

*** Starting CLI:
mininet>
また、コントローラ用のxtermをもうひとつ起動しておきます。
mininet> xterm c0
mininet>
続いて、使用するOpenFlowのバージョンを1.3に設定します。
switch: s1 (root):
root@ryu-vm:~# ovs-vsctl set Bridge s1 protocols=OpenFlow13
最後に、コントローラのxterm上でrest_firewallを起動させます。
controller: c0 (root):
root@ryu-vm:~# ryu-manager ryu.app.rest_firewall
loading app ryu.app.rest_firewall
loading app ryu.controller.ofp_handler
instantiating app None of DPSet
creating context dpset
creating context wsgi
instantiating app ryu.app.rest_firewall of RestFirewallAPI
instantiating app ryu.controller.ofp_handler of OFPHandler
(2210) wsgi starting up on http://0.0.0.0:8080/
Ryuとスイッチの間の接続に成功すると、次のメッセージが表示されます。
controller: c0 (root):
[FW][INFO] switch_id=0000000000000001: Join as firewall
初期状態の変更
firewallの起動直後は、すべての通信を遮断するよう無効状態となっています。次のコマンドで有効(enable)にします。
ノート
以降の説明で使用するREST APIの詳細は、章末の「REST API一覧」を参照してください。
Node: c0 (root):
root@ryu-vm:~# curl -X PUT http://localhost:8080/firewall/module/enable/0000000000000001
  [
    {
      "switch_id": "0000000000000001",
      "command_result": {
        "result": "success",
        "details": "firewall running."
      }
    }
  ]

root@ryu-vm:~# curl http://localhost:8080/firewall/module/status
  [
    {
      "status": "enable",
      "switch_id": "0000000000000001"
    }
  ]
ノート
RESTコマンドの実行結果は見やすいように整形しています。
h1からh2へのpingの疎通を確認してみます。しかし、アクセス許可のルールを設定していないため遮断されてしまいます。
host: h1:
root@ryu-vm:~# ping 10.0.0.2
PING 10.0.0.2 (10.0.0.2) 56(84) bytes of data.
^C
--- 10.0.0.2 ping statistics ---
20 packets transmitted, 0 received, 100% packet loss, time 19003ms
遮断されたパケットはログに出力されます。
controller: c0 (root):
[FW][INFO] dpid=0000000000000001: Blocked packet = ethernet(dst='00:00:00:00:00:02',ethertype=2048,src='00:00:00:00:00:01'), ipv4(csum=9895,dst='10.0.0.2',flags=2,header_length=5,identification=0,offset=0,option=None,proto=1,src='10.0.0.1',tos=0,total_length=84,ttl=64,version=4), icmp(code=0,csum=55644,data=echo(data='K\x8e\xaeR\x00\x00\x00\x00=\xc6\r\x00\x00\x00\x00\x00\x10\x11\x12\x13\x14\x15\x16\x17\x18\x19\x1a\x1b\x1c\x1d\x1e\x1f !"#$%&\'()*+,-./01234567',id=6952,seq=1),type=8)
...
ルール追加
h1とh2の間でpingを許可するルールを追加します。双方向にルールを追加をする必要があります。
次のルールを追加してみましょう。ルールIDは自動採番されます。
| 送信元 | 宛先 | プロトコル | 可否 | (ルールID) |
|---|---|---|---|---|
| 10.0.0.1/32 | 10.0.0.2/32 | ICMP | 許可 | 1 |
| 10.0.0.2/32 | 10.0.0.1/32 | ICMP | 許可 | 2 |
Node: c0 (root):
root@ryu-vm:~# curl -X POST -d '{"nw_src": "10.0.0.1/32", "nw_dst": "10.0.0.2/32", "nw_proto": "ICMP"}' http://localhost:8080/firewall/rules/0000000000000001
  [
    {
      "switch_id": "0000000000000001",
      "command_result": [
        {
          "result": "success",
          "details": "Rule added. : rule_id=1"
        }
      ]
    }
  ]

root@ryu-vm:~# curl -X POST -d '{"nw_src": "10.0.0.2/32", "nw_dst": "10.0.0.1/32", "nw_proto": "ICMP"}' http://localhost:8080/firewall/rules/0000000000000001
  [
    {
      "switch_id": "0000000000000001",
      "command_result": [
        {
          "result": "success",
          "details": "Rule added. : rule_id=2"
        }
      ]
    }
  ]
追加したルールがフローエントリとしてスイッチに登録されます。
switch: s1 (root):
root@ryu-vm:~# ovs-ofctl -O openflow13 dump-flows s1
OFPST_FLOW reply (OF1.3) (xid=0x2):
 cookie=0x0, duration=823.705s, table=0, n_packets=10, n_bytes=420, priority=65534,arp actions=NORMAL
 cookie=0x0, duration=542.472s, table=0, n_packets=20, n_bytes=1960, priority=0 actions=CONTROLLER:128
 cookie=0x1, duration=145.05s, table=0, n_packets=0, n_bytes=0, priority=1,icmp,nw_src=10.0.0.1,nw_dst=10.0.0.2 actions=NORMAL
 cookie=0x2, duration=118.265s, table=0, n_packets=0, n_bytes=0, priority=1,icmp,nw_src=10.0.0.2,nw_dst=10.0.0.1 actions=NORMAL
また、h2とh3の間で、pingを含むすべてのIPv4パケットを許可するようルールを追加します。
| 送信元 | 宛先 | プロトコル | 可否 | (ルールID) |
|---|---|---|---|---|
| 10.0.0.2/32 | 10.0.0.3/32 | any | 許可 | 3 |
| 10.0.0.3/32 | 10.0.0.2/32 | any | 許可 | 4 |
Node: c0 (root):
root@ryu-vm:~# curl -X POST -d '{"nw_src": "10.0.0.2/32", "nw_dst": "10.0.0.3/32"}' http://localhost:8080/firewall/rules/0000000000000001
  [
    {
      "switch_id": "0000000000000001",
      "command_result": [
        {
          "result": "success",
          "details": "Rule added. : rule_id=3"
        }
      ]
    }
  ]

root@ryu-vm:~# curl -X POST -d '{"nw_src": "10.0.0.3/32", "nw_dst": "10.0.0.2/32"}' http://localhost:8080/firewall/rules/0000000000000001
  [
    {
      "switch_id": "0000000000000001",
      "command_result": [
        {
          "result": "success",
          "details": "Rule added. : rule_id=4"
        }
      ]
    }
  ]
追加したルールがフローエントリとしてスイッチに登録されます。
switch: s1 (root):
OFPST_FLOW reply (OF1.3) (xid=0x2):
 cookie=0x3, duration=12.724s, table=0, n_packets=0, n_bytes=0, priority=1,ip,nw_src=10.0.0.2,nw_dst=10.0.0.3 actions=NORMAL
 cookie=0x4, duration=3.668s, table=0, n_packets=0, n_bytes=0, priority=1,ip,nw_src=10.0.0.3,nw_dst=10.0.0.2 actions=NORMAL
 cookie=0x0, duration=1040.802s, table=0, n_packets=10, n_bytes=420, priority=65534,arp actions=NORMAL
 cookie=0x0, duration=759.569s, table=0, n_packets=20, n_bytes=1960, priority=0 actions=CONTROLLER:128
 cookie=0x1, duration=362.147s, table=0, n_packets=0, n_bytes=0, priority=1,icmp,nw_src=10.0.0.1,nw_dst=10.0.0.2 actions=NORMAL
 cookie=0x2, duration=335.362s, table=0, n_packets=0, n_bytes=0, priority=1,icmp,nw_src=10.0.0.2,nw_dst=10.0.0.1 actions=NORMAL
ルールには優先度を設定することが出来ます。
h2とh3の間でping(ICMP)を遮断するルールを追加してみましょう。優先度としてデフォルト値の1より大きい値を設定します。
| (優先度) | 送信元 | 宛先 | プロトコル | 可否 | (ルールID) |
|---|---|---|---|---|---|
| 10 | 10.0.0.2/32 | 10.0.0.3/32 | ICMP | 遮断 | 5 |
| 10 | 10.0.0.3/32 | 10.0.0.2/32 | ICMP | 遮断 | 6 |
Node: c0 (root):
root@ryu-vm:~# curl -X POST -d  '{"nw_src": "10.0.0.2/32", "nw_dst": "10.0.0.3/32", "nw_proto": "ICMP", "actions": "DENY", "priority": "10"}' http://localhost:8080/firewall/rules/0000000000000001
  [
    {
      "switch_id": "0000000000000001",
      "command_result": [
        {
          "result": "success",
          "details": "Rule added. : rule_id=5"
        }
      ]
    }
  ]

root@ryu-vm:~# curl -X POST -d  '{"nw_src": "10.0.0.3/32", "nw_dst": "10.0.0.2/32", "nw_proto": "ICMP", "actions": "DENY", "priority": "10"}' http://localhost:8080/firewall/rules/0000000000000001
  [
    {
      "switch_id": "0000000000000001",
      "command_result": [
        {
          "result": "success",
          "details": "Rule added. : rule_id=6"
        }
      ]
    }
  ]
追加したルールがフローエントリとしてスイッチに登録されます。
switch: s1 (root):
root@ryu-vm:~# ovs-ofctl -O openflow13 dump-flows s1
OFPST_FLOW reply (OF1.3) (xid=0x2):
 cookie=0x3, duration=242.155s, table=0, n_packets=0, n_bytes=0, priority=1,ip,nw_src=10.0.0.2,nw_dst=10.0.0.3 actions=NORMAL
 cookie=0x4, duration=233.099s, table=0, n_packets=0, n_bytes=0, priority=1,ip,nw_src=10.0.0.3,nw_dst=10.0.0.2 actions=NORMAL
 cookie=0x0, duration=1270.233s, table=0, n_packets=10, n_bytes=420, priority=65534,arp actions=NORMAL
 cookie=0x0, duration=989s, table=0, n_packets=20, n_bytes=1960, priority=0 actions=CONTROLLER:128
 cookie=0x5, duration=26.984s, table=0, n_packets=0, n_bytes=0, priority=10,icmp,nw_src=10.0.0.2,nw_dst=10.0.0.3 actions=CONTROLLER:128
 cookie=0x1, duration=591.578s, table=0, n_packets=0, n_bytes=0, priority=1,icmp,nw_src=10.0.0.1,nw_dst=10.0.0.2 actions=NORMAL
 cookie=0x6, duration=14.523s, table=0, n_packets=0, n_bytes=0, priority=10,icmp,nw_src=10.0.0.3,nw_dst=10.0.0.2 actions=CONTROLLER:128
 cookie=0x2, duration=564.793s, table=0, n_packets=0, n_bytes=0, priority=1,icmp,nw_src=10.0.0.2,nw_dst=10.0.0.1 actions=NORMAL
ルール確認
設定されているルールを確認します。
Node: c0 (root):
root@ryu-vm:~# curl http://localhost:8080/firewall/rules/0000000000000001
  [
    {
      "access_control_list": [
        {
          "rules": [
            {
              "priority": 1,
              "dl_type": "IPv4",
              "nw_dst": "10.0.0.3",
              "nw_src": "10.0.0.2",
              "rule_id": 3,
              "actions": "ALLOW"
            },
            {
              "priority": 1,
              "dl_type": "IPv4",
              "nw_dst": "10.0.0.2",
              "nw_src": "10.0.0.3",
              "rule_id": 4,
              "actions": "ALLOW"
            },
            {
              "priority": 10,
              "dl_type": "IPv4",
              "nw_proto": "ICMP",
              "nw_dst": "10.0.0.3",
              "nw_src": "10.0.0.2",
              "rule_id": 5,
              "actions": "DENY"
            },
            {
              "priority": 1,
              "dl_type": "IPv4",
              "nw_proto": "ICMP",
              "nw_dst": "10.0.0.2",
              "nw_src": "10.0.0.1",
              "rule_id": 1,
              "actions": "ALLOW"
            },
            {
              "priority": 10,
              "dl_type": "IPv4",
              "nw_proto": "ICMP",
              "nw_dst": "10.0.0.2",
              "nw_src": "10.0.0.3",
              "rule_id": 6,
              "actions": "DENY"
            },
            {
              "priority": 1,
              "dl_type": "IPv4",
              "nw_proto": "ICMP",
              "nw_dst": "10.0.0.1",
              "nw_src": "10.0.0.2",
              "rule_id": 2,
              "actions": "ALLOW"
            }
          ]
        }
      ],
      "switch_id": "0000000000000001"
    }
  ]
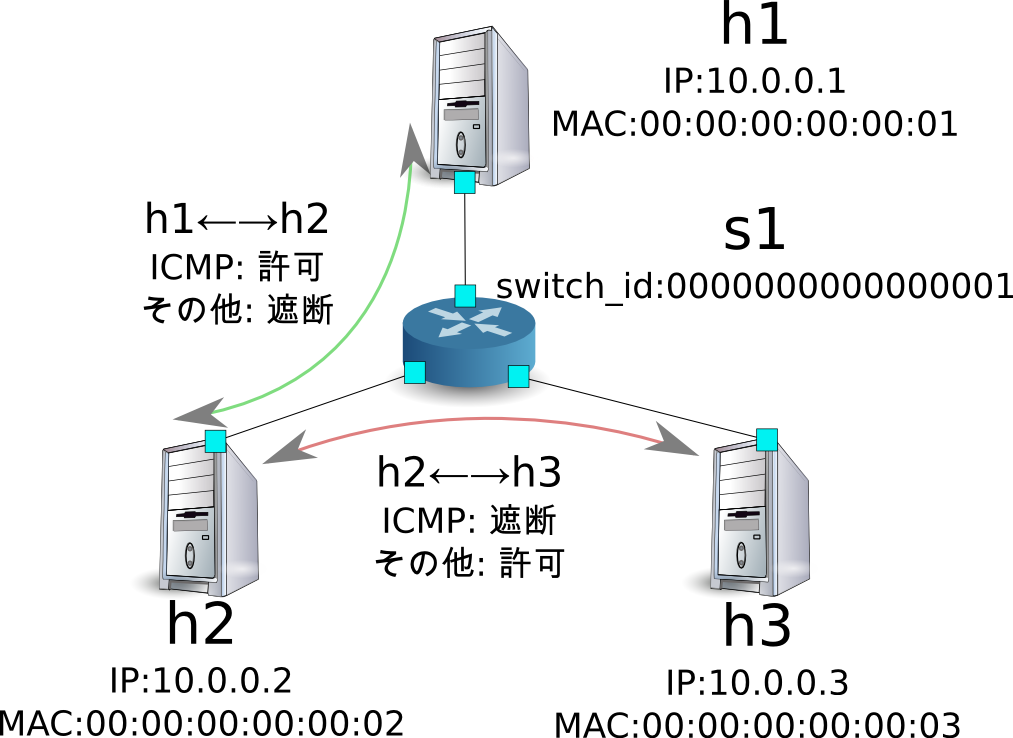
設定したルールを図示すると以下のようになります。
h1からh2にpingを実行してみます。許可するルールが設定されているので、pingが疎通します。
host: h1:
root@ryu-vm:~# ping 10.0.0.2
PING 10.0.0.2 (10.0.0.2) 56(84) bytes of data.
64 bytes from 10.0.0.2: icmp_req=1 ttl=64 time=0.419 ms
64 bytes from 10.0.0.2: icmp_req=2 ttl=64 time=0.047 ms
64 bytes from 10.0.0.2: icmp_req=3 ttl=64 time=0.060 ms
64 bytes from 10.0.0.2: icmp_req=4 ttl=64 time=0.033 ms
...
h1からh2へのping以外のパケットはfirewallによって遮断されます。例えばh1からh2にwgetを実行すると、パケットが遮断された旨ログが出力されます。
host: h1:
root@ryu-vm:~# wget http://10.0.0.2
--2013-12-16 15:00:38--  http://10.0.0.2/
Connecting to 10.0.0.2:80... ^C
controller: c0 (root):
[FW][INFO] dpid=0000000000000001: Blocked packet = ethernet(dst='00:00:00:00:00:02',ethertype=2048,src='00:00:00:00:00:01'), ipv4(csum=4812,dst='10.0.0.2',flags=2,header_length=5,identification=5102,offset=0,option=None,proto=6,src='10.0.0.1',tos=0,total_length=60,ttl=64,version=4), tcp(ack=0,bits=2,csum=45753,dst_port=80,offset=10,option='\x02\x04\x05\xb4\x04\x02\x08\n\x00H:\x99\x00\x00\x00\x00\x01\x03\x03\t',seq=1021913463,src_port=42664,urgent=0,window_size=14600)
...
h2とh3の間はping以外のパケットの疎通が可能となっています。例えばh2からh3にsshを実行すると、パケットが遮断された旨のログは出力されません(h3でsshdが動作していないため、sshでの接続には失敗します)。
host: h2:
root@ryu-vm:~# ssh 10.0.0.3
ssh: connect to host 10.0.0.3 port 22: Connection refused
h2からh3にpingを実行すると、パケットがfirewallによって遮断された旨ログが出力されます。
host: h2:
root@ryu-vm:~# ping 10.0.0.3
PING 10.0.0.3 (10.0.0.3) 56(84) bytes of data.
^C
--- 10.0.0.3 ping statistics ---
8 packets transmitted, 0 received, 100% packet loss, time 7055ms
controller: c0 (root):
[FW][INFO] dpid=0000000000000001: Blocked packet = ethernet(dst='00:00:00:00:00:03',ethertype=2048,src='00:00:00:00:00:02'), ipv4(csum=9893,dst='10.0.0.3',flags=2,header_length=5,identification=0,offset=0,option=None,proto=1,src='10.0.0.2',tos=0,total_length=84,ttl=64,version=4), icmp(code=0,csum=35642,data=echo(data='\r\x12\xcaR\x00\x00\x00\x00\xab\x8b\t\x00\x00\x00\x00\x00\x10\x11\x12\x13\x14\x15\x16\x17\x18\x19\x1a\x1b\x1c\x1d\x1e\x1f !"#$%&\'()*+,-./01234567',id=8705,seq=1),type=8)
...
ルール削除
“rule_id:5”および”rule_id:6”のルールを削除します。
Node: c0 (root):
root@ryu-vm:~# curl -X DELETE -d '{"rule_id": "5"}' http://localhost:8080/firewall/rules/0000000000000001
  [
    {
      "switch_id": "0000000000000001",
      "command_result": [
        {
          "result": "success",
          "details": "Rule deleted. : ruleID=5"
        }
      ]
    }
  ]

root@ryu-vm:~# curl -X DELETE -d '{"rule_id": "6"}' http://localhost:8080/firewall/rules/0000000000000001
  [
    {
      "switch_id": "0000000000000001",
      "command_result": [
        {
          "result": "success",
          "details": "Rule deleted. : ruleID=6"
        }
      ]
    }
  ]
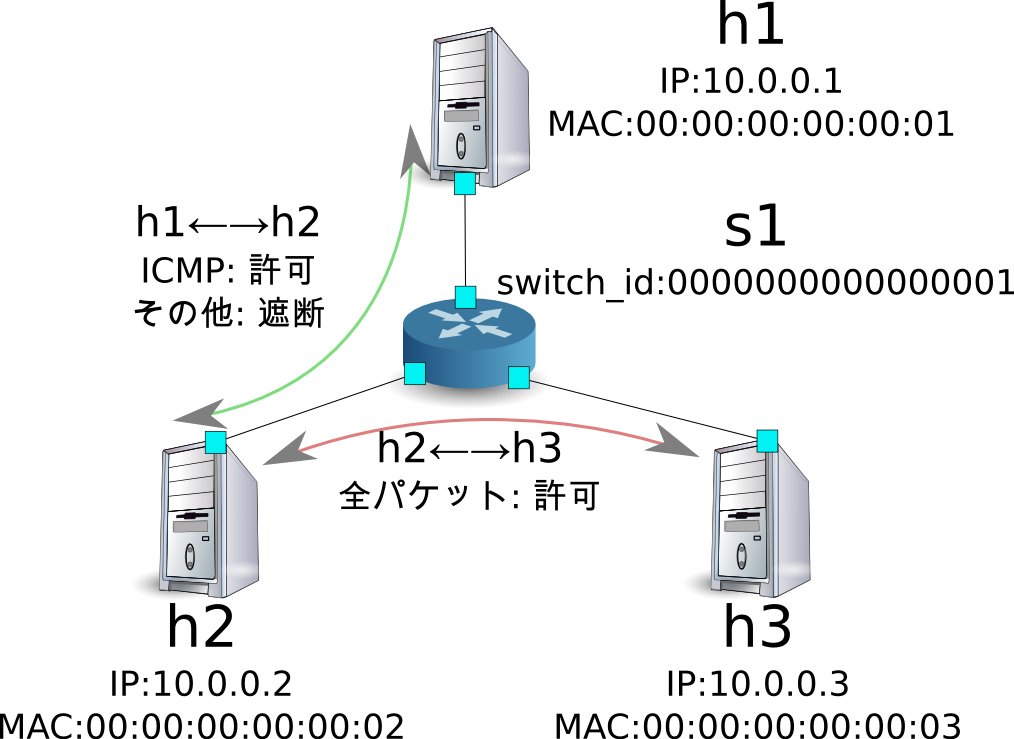
現在のルールを図示すると以下のようになります。
実際に確認します。h2とh3の間のping(ICMP)を遮断するルールが削除されたため、pingが疎通できるようになったことがわかります。
host: h2:
root@ryu-vm:~# ping 10.0.0.3
PING 10.0.0.3 (10.0.0.3) 56(84) bytes of data.
64 bytes from 10.0.0.3: icmp_req=1 ttl=64 time=0.841 ms
64 bytes from 10.0.0.3: icmp_req=2 ttl=64 time=0.036 ms
64 bytes from 10.0.0.3: icmp_req=3 ttl=64 time=0.026 ms
64 bytes from 10.0.0.3: icmp_req=4 ttl=64 time=0.033 ms
...
マルチテナントでの動作例
続いて、VLANによるテナント分けが行われている以下のようなトポロジを作成し、スイッチs1に対してルールの追加・削除を行い、各ホスト間の疎通可否を確認する例を紹介します。
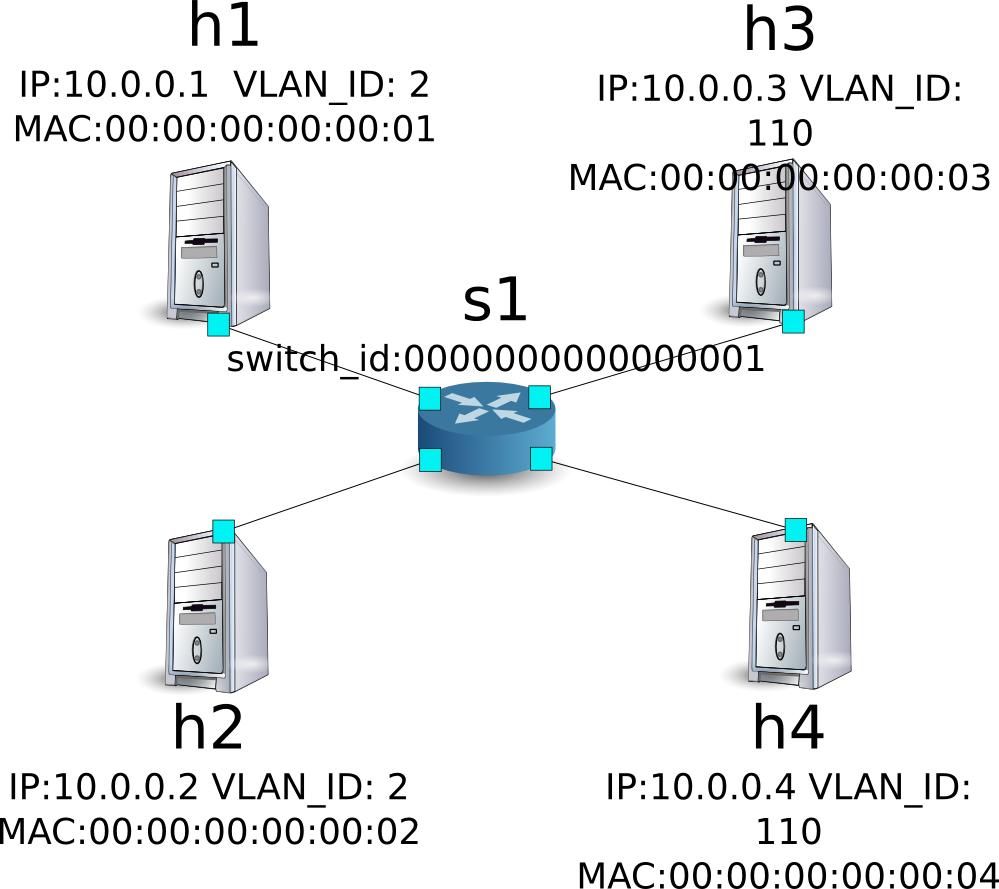
環境構築
シングルテナントでの例と同様、Mininet上に環境を構築し、コントローラ用のxtermをもうひとつ起動しておきます。使用するホストがひとつ増えていることにご注意ください。
ryu@ryu-vm:~$ sudo mn --topo single,4 --mac --switch ovsk --controller remote -x
*** Creating network
*** Adding controller
Unable to contact the remote controller at 127.0.0.1:6633
*** Adding hosts:
h1 h2 h3 h4
*** Adding switches:
s1
*** Adding links:
(h1, s1) (h2, s1) (h3, s1) (h4, s1)
*** Configuring hosts
h1 h2 h3 h4
*** Running terms on localhost:10.0
*** Starting controller
*** Starting 1 switches
s1

*** Starting CLI:
mininet> xterm c0
mininet>
続いて、各ホストのインターフェースにVLAN IDを設定します。
host: h1:
root@ryu-vm:~# ip addr del 10.0.0.1/8 dev h1-eth0
root@ryu-vm:~# ip link add link h1-eth0 name h1-eth0.2 type vlan id 2
root@ryu-vm:~# ip addr add 10.0.0.1/8 dev h1-eth0.2
root@ryu-vm:~# ip link set dev h1-eth0.2 up
host: h2:
root@ryu-vm:~# ip addr del 10.0.0.2/8 dev h2-eth0
root@ryu-vm:~# ip link add link h2-eth0 name h2-eth0.2 type vlan id 2
root@ryu-vm:~# ip addr add 10.0.0.2/8 dev h2-eth0.2
root@ryu-vm:~# ip link set dev h2-eth0.2 up
host: h3:
root@ryu-vm:~# ip addr del 10.0.0.3/8 dev h3-eth0
root@ryu-vm:~# ip link add link h3-eth0 name h3-eth0.110 type vlan id 110
root@ryu-vm:~# ip addr add 10.0.0.3/8 dev h3-eth0.110
root@ryu-vm:~# ip link set dev h3-eth0.110 up
host: h4:
root@ryu-vm:~# ip addr del 10.0.0.4/8 dev h4-eth0
root@ryu-vm:~# ip link add link h4-eth0 name h4-eth0.110 type vlan id 110
root@ryu-vm:~# ip addr add 10.0.0.4/8 dev h4-eth0.110
root@ryu-vm:~# ip link set dev h4-eth0.110 up
さらに、使用するOpenFlowのバージョンを1.3に設定します。
switch: s1 (root):
root@ryu-vm:~# ovs-vsctl set Bridge s1 protocols=OpenFlow13
最後に、コントローラのxterm上でrest_firewallを起動させます。
controller: c0 (root):
root@ryu-vm:~# ryu-manager ryu.app.rest_firewall
loading app ryu.app.rest_firewall
loading app ryu.controller.ofp_handler
instantiating app None of DPSet
creating context dpset
creating context wsgi
instantiating app ryu.app.rest_firewall of RestFirewallAPI
instantiating app ryu.controller.ofp_handler of OFPHandler
(13419) wsgi starting up on http://0.0.0.0:8080/
Ryuとスイッチの間の接続に成功すると、次のメッセージが表示されます。
controller: c0 (root):
[FW][INFO] switch_id=0000000000000001: Join as firewall
初期状態の変更
firewallを有効(enable)にします。
Node: c0 (root):
root@ryu-vm:~# curl -X PUT http://localhost:8080/firewall/module/enable/0000000000000001
  [
    {
      "switch_id": "0000000000000001",
      "command_result": {
        "result": "success",
        "details": "firewall running."
      }
    }
  ]

root@ryu-vm:~# curl http://localhost:8080/firewall/module/status
  [
    {
      "status": "enable",
      "switch_id": "0000000000000001"
    }
  ]
ルール追加
vlan_id=2に10.0.0.0/8で送受信されるping(ICMPパケット)を許可するルールを追加します。双方向にルールを設定をする必要がありますので、ルールをふたつ追加します。
| (優先度) | VLAN ID | 送信元 | 宛先 | プロトコル | 可否 | (ルールID) |
|---|---|---|---|---|---|---|
| 1 | 2 | 10.0.0.0/8 | any | ICMP | 許可 | 1 |
| 1 | 2 | any | 10.0.0.0/8 | ICMP | 許可 | 2 |
Node: c0 (root):
root@ryu-vm:~# curl -X POST -d '{"nw_src": "10.0.0.0/8", "nw_proto": "ICMP"}' http://localhost:8080/firewall/rules/0000000000000001/2
  [
    {
      "switch_id": "0000000000000001",
      "command_result": [
        {
          "result": "success",
          "vlan_id": 2,
          "details": "Rule added. : rule_id=1"
        }
      ]
    }
  ]

root@ryu-vm:~# curl -X POST -d '{"nw_dst": "10.0.0.0/8", "nw_proto": "ICMP"}' http://localhost:8080/firewall/rules/0000000000000001/2
  [
    {
      "switch_id": "0000000000000001",
      "command_result": [
        {
          "result": "success",
          "vlan_id": 2,
          "details": "Rule added. : rule_id=2"
        }
      ]
    }
  ]
ルール確認
設定されているルールを確認します。
Node: c0 (root):
root@ryu-vm:~# curl http://localhost:8080/firewall/rules/0000000000000001/all
  [
    {
      "access_control_list": [
        {
          "rules": [
            {
              "priority": 1,
              "dl_type": "IPv4",
              "nw_proto": "ICMP",
              "dl_vlan": 2,
              "nw_src": "10.0.0.0/8",
              "rule_id": 1,
              "actions": "ALLOW"
            },
            {
              "priority": 1,
              "dl_type": "IPv4",
              "nw_proto": "ICMP",
              "nw_dst": "10.0.0.0/8",
              "dl_vlan": 2,
              "rule_id": 2,
              "actions": "ALLOW"
            }
          ],
          "vlan_id": 2
        }
      ],
      "switch_id": "0000000000000001"
    }
  ]
実際に確認してみます。vlan_id=2であるh1から、同じくvlan_id=2であるh2に対し、pingを実行すると、追加したルールのとおり疎通できることがわかります。
host: h1:
root@ryu-vm:~# ping 10.0.0.2
PING 10.0.0.2 (10.0.0.2) 56(84) bytes of data.
64 bytes from 10.0.0.2: icmp_req=1 ttl=64 time=0.893 ms
64 bytes from 10.0.0.2: icmp_req=2 ttl=64 time=0.098 ms
64 bytes from 10.0.0.2: icmp_req=3 ttl=64 time=0.122 ms
64 bytes from 10.0.0.2: icmp_req=4 ttl=64 time=0.047 ms
...
vlan_id=110同士であるh3とh4の間は、ルールが登録されていないため、pingパケットは遮断されます。
host: h3:
root@ryu-vm:~# ping 10.0.0.4
PING 10.0.0.4 (10.0.0.4) 56(84) bytes of data.
^C
--- 10.0.0.4 ping statistics ---
6 packets transmitted, 0 received, 100% packet loss, time 4999ms
パケットが遮断されたのでログが出力されます。
controller: c0 (root):
[FW][INFO] dpid=0000000000000001: Blocked packet = ethernet(dst='00:00:00:00:00:04',ethertype=33024,src='00:00:00:00:00:03'), vlan(cfi=0,ethertype=2048,pcp=0,vid=110), ipv4(csum=9891,dst='10.0.0.4',flags=2,header_length=5,identification=0,offset=0,option=None,proto=1,src='10.0.0.3',tos=0,total_length=84,ttl=64,version=4), icmp(code=0,csum=58104,data=echo(data='\xb8\xa9\xaeR\x00\x00\x00\x00\xce\xe3\x02\x00\x00\x00\x00\x00\x10\x11\x12\x13\x14\x15\x16\x17\x18\x19\x1a\x1b\x1c\x1d\x1e\x1f !"#$%&\'()*+,-./01234567',id=7760,seq=4),type=8)
...
本章では、具体例を挙げながらファイアウォールの使用方法を説明しました。
REST API一覧
本章で紹介したrest_firewallのREST API一覧です。
全スイッチの有効無効状態の取得
| メソッド | GET |
| URL | /firewall/module/status |
各スイッチの有効無効状態の変更
| メソッド | PUT |
| URL | /firewall/module/{op}/{switch} –op: [ “enable” | “disable” ] –switch: [ “all” |スイッチID] |
| 備考 | 各スイッチの初期状態は”disable”になっています。 |
全ルールの取得
| メソッド | GET |
| URL | /firewall/rules/{switch}[/{vlan}] –switch: [ “all” |スイッチID] –vlan: [ “all” |VLAN ID] |
| 備考 | VLAN IDの指定はオプションです。 |
ルールの追加
| メソッド | POST |
| URL | /firewall/rules/{switch}[/{vlan}] –switch: [ “all” |スイッチID] –vlan: [ “all” |VLAN ID] |
| データ | priority:[ 0 - 65535 ] in_port:[ 0 - 65535 ] dl_src:”<xx:xx:xx:xx:xx:xx>” dl_dst:”<xx:xx:xx:xx:xx:xx>” dl_type:[ “ARP” | “IPv4” ] nw_src:”<xxx.xxx.xxx.xxx/xx>” nw_dst:”<xxx.xxx.xxx.xxx/xx”> nw_proto”:[ “TCP” | “UDP” | “ICMP” ] tp_src:[ 0 - 65535 ] tp_dst:[ 0 - 65535 ] actions: [ “ALLOW” | “DENY” ] |
| 備考 | 登録に成功するとルールIDが生成され、応答に記載されます。 VLAN IDの指定はオプションです。 |
ルールの削除
| メソッド | DELETE |
| URL | /firewall/rules/{switch}[/{vlan}] –switch: [ “all” |スイッチID] –vlan: [ “all” |VLAN ID] |
| データ | rule_id:[ “all” | 1 - ... ] |
| 備考 | VLAN IDの指定はオプションです。 |
全スイッチのログ出力状態の取得
| メソッド | GET |
| URL | /firewall/log/status |
各スイッチのログ出力状態の変更
| メソッド | PUT |
| URL | /firewall/log/{op}/{switch} –op: [ “enable” | “disable” ] –switch: [ “all” |スイッチID] |
| 備考 | 各スイッチの初期状態は”enable”になっています。 |